After the payment
Once a payment is made, you can manage it in your Personal Area on Merchant Portal or over the API. Read the sections below to learn more.
Reversal & Refund
If you want to cancel the payment, you can perform one of two operations, depending on the order status: reversal or refund. These operations are described below.
Reversal
Reversal means that the transaction is cancelled and all the funds reserved on the client’s account are released. This operation can be applied to two-phase transactions, when the funds are reserved but not captured yet (Approved status). After the reversal, the transaction gets the Reversed status.
The following ways of reversal are available:
- Reversing a payment on Merchant Portal by clicking the Reverse/Refund button in transaction details. This button works both for reverse and refund depending on the transaction status. Merchant Portal makes a reverse if possible, and if not, makes a refund. Read more here.
Reversing a payment over the API by sending the reverse.do request.
Reversing all two-phase payments automatically after some period. If you need this functionality, contact the support team of the bank.
See the details of reversal of the order with multiple captures.
Refund
Refund means returning already captured funds to the customer. This operation can be applied to one-phase or two-phase transactions when the funds are already captured (Deposited status). You can make refund more than once, but for a total amount not exceeding the initial captured amount.
The following ways of issuing a refund are available:
- Issuing a refund on Merchant Portal by clicking the Reverse/Refund button in transaction details. This button works both for reverse and refund depending on the transaction status. Merchant Portal makes a reverse if possible, and if not, makes a refund. Read more here.
- Issuing a refund via API by sending the refund.do request.
See the details of refund of the order with multiple captures.
Both reversal and refund can trigger callback notifications. Read more here.
Getting the order status
You can check the order status at any moment. For example, you may check it after the payment to make sure the order is really paid. The status of the order is available on the Merchant Portal and can also be retrieved over the API.
Looking up the order status on Merchant Portal
You can see the order status in the Transaction details page of the corresponding transaction.
In particular, status Deposited means a succesfull payment.
Getting the order status over the API
The online store sends the getOrderStatusExtended.do request to the Payment Gateway to check the order status. The request contains either orderId (the unique order number in the payment gateway) or orderNumber (the unique order number in the online store’s system). If both parameters are passed to the payment gateway, orderId has higher priority.
The payment gateway returns the order status in the orderStatus parameter. Status 2 means a succesfull payment.
Additional functionality
Two-phase payments
Types of payment
A company may use two types of payments, depending on the specifics of its business:
- One-phase - transactions for payment for goods/services made over the Internet using bank cards that do not require additional confirmation, i.e. holding and debiting of funds takes place in one stage. This type of payments is preferable if the goods or service is provided immediately after payment
- Two-phase - transactions for payment for goods/services made via the Internet with the use of bank cards that require additional confirmation, i.e. payment is made in two stages. At the first stage the check of availability and holding of funds of the payer (pre-authorization) takes place; then, at the second stage, the company either confirms to debit funds, or cancels holding of funds
The amount to be debited may be less than the amount that was held. Debits exceeding the held amount are available as well (with configurable limits). If you need this feature please contact our Support Service.
Two-phase payments should be used if some time elapses between the buyer's decision to pay and delivery of the selected good or service.
For the payment to be a two-phase payment, the order must be registered via registerPreAuth.do request, not register.do.
Two-phase payment is suitable for any method of integration:
For Redirect, Direct, CMS, SDK integration options, it is possible to register and complete an order via API.
Captures
A capture of a pre-authorized amount happens in the second phase of the two-phase payment, when the funds are debited from card holder's account. Once the capture occurs, the order becomes completed and goes in the DEPOSITED status. The amount captured can be greater or less than the pre-authorization amount, and partial capture in increments is available as well. If you do not pass the amount, then the full amount will be executed.
There are three ways to make a capture:
- Capturing a payment on Merchant Portal
- Capturing a payment over the API
- Capturing all two-phase payments automatically after some period
It is available to do a partial capture. It will be less than the order amount and immediately final.
Autocompletion and autoreversal
If you have this feature enabled for you by our support team, you can set up your payment integration so that all preauthorized (Approved) two-phase orders would be completed or reversed automatically after a specific time period. This means that you don't have to process each order manually in the Merchant Portal or to call deposit.do or reverse.do API methods.
To enable order autocompletion via the Merchant Portal:
- Log in to Personal Area.
- In the navigation bar to the left, go to Settings by clicking on the
 icon.
icon. - Go to the General tab.
- In the Autocomplete section, select Autocomplete enabled.
- In the Completion time (in hours) field, enter the number of hours after registration, through which a two-phase order should be automatically completed.

It is also possible to enable order autoreversal. In this case, all preauthorized (Approved) two-phase orders will be automatically reversed after a predefined period. Reversal means that the transaction is canceled and all the funds reserved on the client’s account are released.
It is possible to set the date and time of autocompletion and autoreversal via API, by passing the autocompletionDate and autoReverseDate parameters in registerPreAuth.do or instantPayment.do API requests. The used timezone is UTC+0.
Please find below the points describing the logic how autocompletion and autoreversal works.
When the order is registered and autocompletion is set for it:
- If the order status remains Created at the moment the predefined completion starts, no kind of operation will be applied to the order: finally it will expire and be closed. In case the order is deposited after the predefined completion period has passed, the autocompletion won't work.
- If the order is preauthorized and not completed before the predefined completion period, the order will be fully completed, i.e. the preauthorized amount will be automatically deposited in full.
- If the order is preathorized and completed before the predefined completion period, the order status will change according to its normal lifecycle.
- If refund/reverse is applied to the order before the predefined completion period, the autocompletion won't work then.
When the order is registered and autoreversal is set for it:
- If the order status remains Created at the moment the predefined reversal starts, no kind of operation will be applied to the order: finally it will expire and be closed. In case the order is deposited after the predefined autoreversal period has passed, the autoreversal won't work.
- If the order is preauthorized and not completed before the predefined reversal period, the order will be fully canceled, i.e. the preauthorized amount will be automatically reversed in full.
- If the order is preathorized and completed before the predefined reversal period, the order status will change according to its normal lifecycle.
- If refund/reverse is applied to the order before the predefined reversal period, the autoreversal won't work then.
See the details of autocompletion and autoreversal of the order with multiple captures.
Multiple captures
An order can be completed in parts rather than the full amount, if this feature is enabled for your by our support team. This is incremental completion of the same order. You can make multiple captures on the Merchant Portal and over the API.
Multiple captures on Merchant Portal
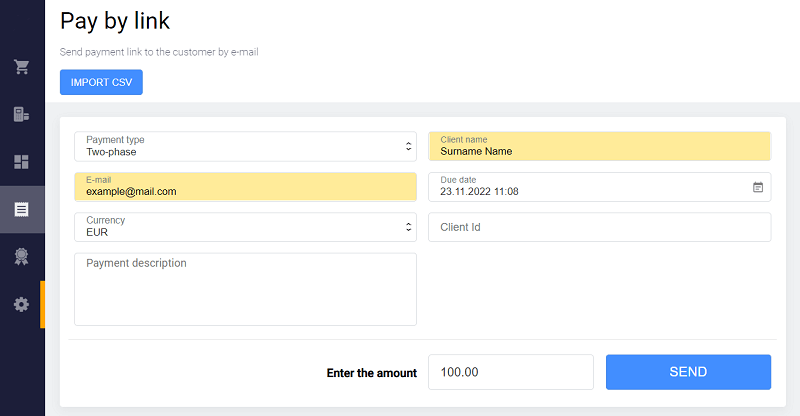
Firstly, go to the Pay by Link block and create a two-phase payment:
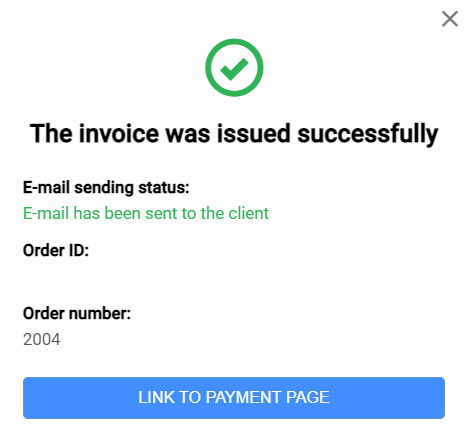
As the invoice is successfully issued, send a link to client:
A client enters card details and confirms payment:

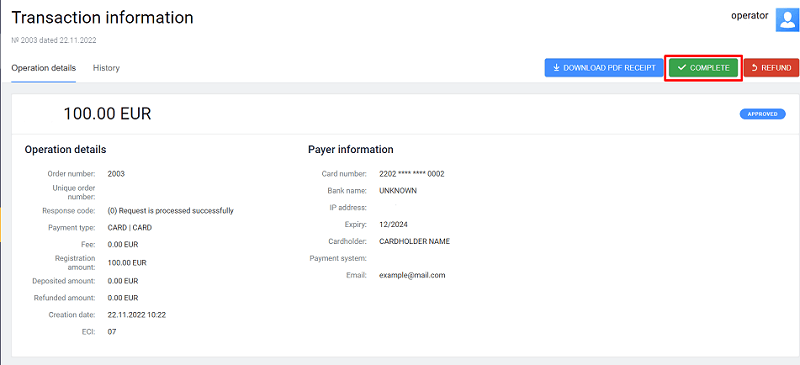
Then go to the Transaction details block and click Complete button to deposit the payment:
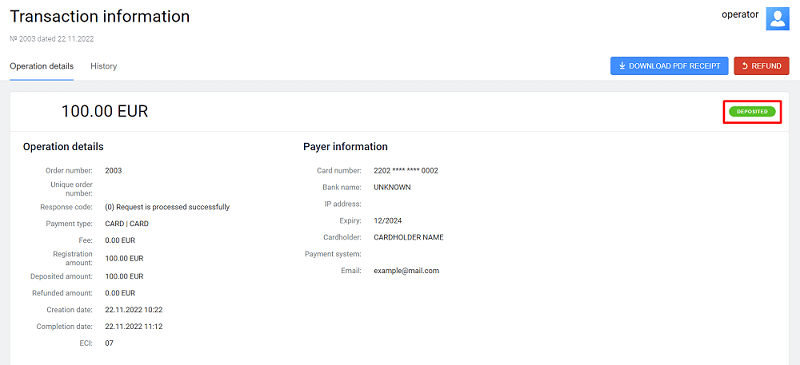
If multiple captures are available, you will see the window with Single and Intermediate tabs.

If you want to do a single deposit, enter the amount to capture on the Single tab and click Confirm. The order will get Deposited status.
If you want to capture only a part of the preauthorized amount, go to the Intermediate tab, enter the amount to capture (it should be less than preauthorized amount) and click Confirm. The order will get Intermediate deposited status.

If you click Complete again, you can either make a new intermediate deposit (use the Intermediate tab) or make a final deposit (use the Final tab).

You can make deposits until the full amount is reached or you make a final deposit. Maximum allowed number of deposits is 99. After the final deposit is made, the order gets Deposited status.
If you make a Final deposit with amount 0, the order gets Deposited status and the rest of preauthorized amount is reversed.
Multiple captures over the API
To perform a payment completion, you must pass the depositType and multipleCompletionOrderDescription parameters in the request deposit.do:
depositType - type of the deposit. Possible values:
- 0 - Single deposit.
- 1 - Intermediate deposit. In this case, the amount should be less than the preauthorized amount. You can make deposits until either the full amount is reached or the transaction state is changed manually to 2 (maximum allowed number of deposits is 99).
- 2 - Final deposit. In this case, the amount should be less than preauthorized amount. If you make a final deposit with amount=0, the order gets Deposited status and the rest of preauthorized amount is reversed automatically. No other deposits or reversals are allowed after the order completion. Only refunds are possible.
multipleCompletionOrderDescription - Description of the multiple completion transaction. The parameter is allowed only if the "Multiple Completions Allowed" permissions are enabled and depositType = 1 or 2
Refund of orders with multiple captures via API
If multiple captures are available, you can refund an order in Intermediate deposited status via API (send refund.do request). In this case, the following rules are applicable:
- If an order is fully refunded (for all deposited amount or without specifying amount), it gets Refund status, all the deposited amount is refunded, and the rest of preauthorized amount is reversed automatically.
- If an order is partly refunded (the specified amount is less than the sum of all deposits), it gets Refund status, the specified amount is refunded, and the rest of preauthorized amount is reversed automatically.
If an order with multiple captures has Deposited status (the final capture has been made), it can be refunded fully or partly and gets Refund status after the refund.
Reversal of orders with multiple captures via API
If multiple captures are available, you can reverse an order in Intermediate deposited status via API (send reverse.do request). In this case, the following rules are applicable:
- If an order is fully reversed (for all preauthorized amount or without specifying amount), it gets Deposited status and the rest of preauthorized amount is reversed.
- If an order is partly reversed (the specified amount is less than preauthorized amount), then the order stays in Intermediate deposited status and the specified amount is reversed.
Refund and reversal of orders with multiple captures via UI
In Merchant Portal, the order in Intermediate deposited status can be reversed or refunded by clicking the Refund button in transaction details.

The same button is used for both operations according to the following logic:
- If the button is clicked before EOD (end of the business day), the reversal for the specified amount is made. The order gets the Deposited status and the rest of preauthorized amount is reversed.
- If the button is clicked after EOD (end of the usiness day), the refund for the specified amount is made. The order gets the Refund status, the specified amount is refunded, and the rest of preauthorized amount is reversed.
Autocompletion and autoreversal for multiple captures
If multiple captures are available, autocompletion and autoreversal can be applied to an order in Intermediate deposited status (one or more completions have been done but not for the whole preauthorized amount):
- When the predefined completion period (specified via UI or API) has passed, the rest of preauthorized amount is automatically deposited and the order gets Deposited status.
- When partial reverse has been applied to the order in Intermediate deposited status before the predefined completion period, the order status remains Intermediate deposited and autocompletion works accordingly.
- When the predefined reversal period has passed, the rest of the preauthorized amount is automatically reversed and the order gets Deposited status.
- When partial reverse is applied to the order in Intermediate deposited status before the predefined reversal period, the order status remains Intermediate deposited and autoreversal works accordingly.
Stored-credential transactions
A stored-credential transaction is used when a cardholder authorizes a merchant to store the payment credentials for further payments. For example, a payer may opt to save their card at checkout. In this case a unique token is generated by the Payment Gateway that links the payer's card number (PAN) to their ID in the store system (for example, to payer's login).
Read about the types of stored credentials supported by the Payment Gateway here.
Storing a credential
You can store a payer's credential via API or via the Merchant Portal UI for any type of integration. See the details below.
Storing a credential upon payment via API
To save a card (create a stored credential) in the Payment Gateway via API, you need to pass the clientId parameter in an order registration or payment initiating request. clientId is an identifier of your client (cardholder), all the client's cards will be attached to this number. For test purposes, you may use any number as clientId. This parameter can be passed in the following requests:
- register.do
- registerPreauth.do
- instantPayment.do
- motoPayment.do
- /applepay/payment.do
- /applepay/paymentDirect.do
- /google/payment.do
- /google/paymentDirect.do
The stored credential will be created only after successful payment. After the payment, you will be able to retrieve the identifier of the stored credential (bindingId parameter) by the following ways:
- via the order status request getOrderStatusExtended.do
- via the client's stored credentials request getBindings.do
-
via the callback notification on storing a credential, for example:
https://mybestmerchantreturnurl.com/callback?orderNumber=46046&clientId=9fa029b8-f5d1-4ca7-85e8-317670810cd1&bindingId=7bd483f4-d20d-77eb-b777-2def0169bdc0&mdOrder=7b3491ff-d03d-7305-aa8a-c6470169bdc0&operation=bindingCreated&status=1The
bindingIdandclientIdparameters must be configured in the callback notification settings in the Payment Gateway (contact the support team if you want to use these parameters).
To store a credential upon payment via UI
To store a credential upon payment via UI, go to the Personal Area, issue the invoice via the e-mail and make sure to specify the Client ID parameter. As a result, the client will see the Save my card checkbox on the payment page. If the client checks this checkbox, their credential will be stored: the card data will be saved for this client and the client will not have to enter the card data next time. Read more here.
If you pass the value FORCE_CREATE_BINDING in the features block of the payment request, the credential will be stored forcefully – even if the client has chosen not to save card data on the payment page.
TheFORCE_CREATE_BINDING value cannot be passed in a request with an existing bindingId or bindingNotNeeded = true (will cause validation error). Passing this value also requires passing the clientId parameter.
If both the FORCE_CREATE_BINDING and the VERIFY values are passed in the features block, the order will be created for the purposes of credential storage ONLY (without payment).
Making a stored-credential payment
Stored-credential payments API
Once a credential is stored, you can handle it over the stored-credential payments API (subject to Merchant-level permission). The following methods are available:
- paymentOrderBinding.do – make a stored-credential payment
- getBindings.do – get the list of client's stored credentials
- getBindingsByCardOrId.do – get the list of all stored credentials of a bank card
- unBindCard.do – disable an existing stored credential
- bindCard.do – re-enable an existing stored credential that was disabled
- extendBinding.do – extend a stored credential expiration date
Using stored credentials in wallet payments
You can also store credentials upon payments via Apple Pay and Google Pay wallets. To do this, pass the clientId parameter in a payment request or in an order registration request (see the description of API requests for wallets).
In this case, a stored credential will link the payer's tokenized card number (DPAN) to their ID in the store system (for example, to payer's login). A credential stored this way cannot be used for displaying a card number on a payment page (because the card number is tokenized).
Storing a credential with no charge
If you have this feature enabled for you by our support team, you can store a credential via API with no charge. You can do this by the following ways:
-
Pass the value
VERIFYin thefeaturesblock of any payment request together with theclientIdparameter. In this case, the cardholder will not be charged any amount. The response will contain the identifier of the stored credential in thebindingIdparameter. This binding ID can be used in subsequent requests instead of the saved card details.Read more about the
VERIFYfeature here. Use the createBindingNoPayment.do request.
Cardholder verification
Cardholer's card account can be verified without debiting any funds from it. To do this, pass the VERIFY value in the features block of an order registration or payment request.
When the VERIFY feature is used, the payment card will be verified to make sure it is used by its legitimate owner. If 3-D Secure is available for the card, then 3-D Secure verification will be performed. The amount parameter of the verification request can be 0. Even if some amount is passed in the request, no charge will be made. After a successful registration, order status is changed to REVERSED.
If the VERIFY feature is passed together with the clientId parameter, it can be used to store a credential without payment. Read more in the Stored-credential transactions section.
Redirect to ACS
Regular redirect
If a payment is made with 3-D Secure, merchants must redirect their customers to ACS using the address specified in the acsUrl parameter received from the payment response. The request body must be MD=mdorder&PaReq=paReq&TermUrl=termUrl, where:
-
MD- unique order ID in the payment gateway; -
PaReq- thepaReqparameter received from the payment response. It is the message that should be sent to ACS together with redirect and contains the data necessary for authentication; -
TermUrl- thetermUrlparameter received from the payment response. It is the URL to which ACS redirects the cardholder after authentication.
It must be a POST request (not GET).
Depending on the configuration agreed with your bank, the customer after ACS authentication will be redirected either to the store or to the payment gateway.
Example of a POST request for regular redirect:
<html>
<head><title>ACS Redirect</title></head>
<body onload="document.forms['acs'].submit()">
ACS Redirect
<form id="acs" method="post" action="[result.acsUrl]">
    <input type="hidden" id="MD" name="MD" value="[MD]"/>
    <input type="hidden" id="PaReq" name="PaReq" value="[result.PaReq]"/>
    <input type="hidden" id="TermUrl" name="TermUrl" value="[result.TermUrl]"/>
</form>
</body>
</html>Regular redirect (advanced 3DS2 scheme)
If 3-D Secure is used, merchants should redirect their clients to the ACS using the address specified in the acsUrl parameter received from the payment response.
The request body must be
creq=[packedCReq] where [packedCReq] is the value of packedCReq parameter received in a response to the second payment request.
It must be a POST request (not GET).
Depending on the configuration agreed with your bank, the customer after ACS authentication will be redirected either to the store or to the payment gateway.
Example of a POST request for regular redirect:
<html>
<head><title>ACS Redirect</title></head>
<body onload="document.forms['acs'].submit()">
ACS Redirect
<form id="acs" method="post" action="[acsUrl]">
    <input type="hidden" id="creq" name="creq" value="[packedCReq]"/>
</form>
</body>
</html>Simplified redirect
Alternatively, the online store can use the gateway acsRedirect method, which will perform the same cardholder redirect to the issuer ACS.
Installment Payments
Overview
Installment payment means that a customer pays a bill in small portions (installments) monthly throughout a fixed period of time. If you have this feature enabled for you by our support team, you can process installment payments. For each order, you can configure:
- First installment date – the date when the first payment will be made. Further payments will be made automatically on the same date of each month during the payment period. This date can be in range 1-28, because each month has at least 28 days.
- Number of installments – comma separated list of possible numbers of months, within which the order will be paid. The client will be able to choose one of those values on the payment page.
For example, if the order amount is 1000 EUR, the first installment date is 12022023, and the number of installments chosen by the client is 2, then the client will be charged 500 EUR on February, 12 and on March, 12.
Three installments flows are possible:
Installment paid at the gateway payment page
This flow involves the payment page provided by the payment gateway. The online store simply sends a request to the payment gateway to register an order, after which the payment page handles the rest of the process.
- A customer selects a product in the online store and clicks Buy.
-
The online store sends the register.do or registerPreAuth.do request with an additional
jccFirstInstallmentDateparameter (the format isDDMMYYYY, whereDDis in the range 01-28). This parameter indicates that installment payment is possible for the order and specifies the first installment date. Additionally, thejccPredefinedNbOfInstallmentsparameter may be passed to specify the list of preferred numbers of months that will be displayed to the customer for selection on the payment page. If this parameter is not passed, the default values configured by the support team are used. In response, the Payment Gateway registers the order and returns theorderIdparameter and the URL of the payment page to which the customer will be redirected.Request example:
curl --request POST \
  --url https://gateway-test.jcc.com.cy/payment/rest/register.do \
  --header 'content-type: application/x-www-form-urlencoded' \
  --data amount=2000 \
  --data userName=test_user \
  --data password=test_user_password \
  --data orderNumber=12186373081 \
  --data returnUrl=https://mybestmerchantreturnurl.com \
  --data failUrl=https://mybestmerchantfailurl.com \
  --data email=test@test.com \
  --data clientId=259753456 \
  --data 'jsonParams={"jccFirstInstallmentDate":"12122022", "jccPredefinedNbOfInstallments": "12,24,36"}' \
  --data language=en
Response example:
{
  "orderId": "01491d0b-c848-7dd6-a20d-e96900a7d8c0",
  "formUrl":   "https://gateway-test.jcc.com.cy/payment/merchants/jcc/payment_en.html?mdOrder=01491d0b-c848-7dd6-a20d-e96900a7d8c0"
}
The online store redirects the customer to the payment page at the URL received in the response.
The customer enters the card data or chooses an already saved card data (a stored credential), and then clicks Pay.
The payment page displays the drop-down list of numbers of installment months. The customer selects one of the numbers or selects
-(to pay the order without installments). Then the customer clicks Pay.
The customer sees the final page with the payment results. The date of the first installment payment and the number of installment months are displayed on the final page.

Installments paid via instantPayment.do
This flow is used when the online store uses its own payment page and instantPayment.do request is used for payment. This flow can be divided into three main stages:
Checking installments availability
- A customer selects a product in the online store and clicks Buy.
- The customer is redirected to the payment page of the online store.
- The customer enters the card data or chooses an already saved card data (a stored credential), and then clicks Pay.
-
The online store sends the /jcc/installments/instantPayment/checkAvailability.do request to check if installment payments are available for the card. The request should pass the amount and contain either pan or bindingid to identify the card. Additionally, the request should contain the
jccFirstInstallmentDateparameter to specify the first installment date. Optionally, the request may contain thejccPredefinedNbOfInstallmentsparameter to specify the list of preferred numbers of installment months that will be displayed to the customer on the payment page andmerchantLoginparameter if the order should be registered on behalf of a child merchant. In response, the Payment Gateway returns the list of numbers of installments available for the card.Request example
curl --location --request POST \
  --url https://gateway-test.jcc.com.cy/payment/jcc/installments/instantPayment/checkAvailability.do \
  --header 'Content-Type: application/x-www-form-urlencoded' \
  --data-urlencode 'userName=test_user' \
  --data-urlencode 'password=test_user_password' \
  --data-urlencode 'pan=4000001111111118' \
  --data-urlencode 'amount=799' \
  --data-urlencode 'jccFirstInstallmentDate=12122023' \
  --data-urlencode 'jccPredefinedNbOfInstallments=12,24,36' \
  --data-urlencode 'currency=EUR' \
  --data-urlencode 'merchantLogin=test_user_child'
Response example
{
"errorCode":0,
"errorMessage":"Success",
"numberOfInstallments":["12","24","36"],
"error":false
}
The online store displays the results of the request for the customer to select the number of payments or select to pay the order without installments. Then the customer clicks Pay.
Payment
-
The online store sends the instantPayment.do request to register and pay the order. The request should pass the additional parameters:
-
jccFirstInstallmentDate– first installment date (the same as specified in step 4) -
jccNbOfInstallments- the value selected by the customer on the previous step
Request example
curl --request POST \
--url  https://gateway-test.jcc.com.cy/payment/rest/instantPayment.do \
--header 'content-type: application/x-www-form-urlencoded' \
--data userName=test_user \
--data password=test_user_password \
--data amount=100 \
--data currency=978 \
--data description=my_first_order \
--data orderNumber=1218637308 \
--data pan=5000001111111115 \
--data cvc=123 \
--data expiry=203012 \
--data cardHolderName="TEST CARDHOLDER" \
--data language=en \
--data 'jsonParams={"jccFirstInstallmentDate":"12122023", "jccNbOfInstallments": "12"}' \
--data backUrl=https%3A%2F%2Fmybestmerchantreturnurl.com \
--data failUrl=https%3A%2F%2Fmybestmerchantreturnurl.com
Response example
{ "errorCode": "0", "orderId": "eee72f6e-b980-79c5-92e8-6f4200b1eae0", "info": "Your order is proceeded, redirecting...", "redirect": "https://www.test.com/payment/merchants/gateway/finish.html?orderId=eee72f6e-b980-79c5-92e8-6f4200b1eae0&lang=en", "orderStatus": { "expiration": "202412", "cardholderName": "TEST CARDHOLDER", "depositAmount": 100, "currency": "978", "approvalCode": "123456", "authCode": 2, "ErrorCode": "0", "ErrorMessage": "Success", "OrderStatus": 2, "OrderNumber": "2011", "Pan": "500000**1115", "Amount": 100, "Ip": "x.x.x.x" } } -
Getting payment results
-
The online store sends the getOrderStatusExtended.do request to get the order status. In response, Payment Gateway returns the date of the first installment in
jccFirstInstallmentDateparameter (inmerchantOrderParamssection) and the number of installment months in thejccNbOfInstallmentsparameter (intransactionAttributessection).Request example:
curl --request POST \
  --url https://gateway-test.jcc.com.cy/payment/rest/getOrderStatusExtended.do \
  --header 'content-type: application/x-www-form-urlencoded' \
  --data userName=test_user \
  --data password=test_user_password \
  --data orderId=01491d0b-c848-7dd6-a20d-e96900a7d8c0 \
  --data language=en
Response example:
{
"errorCode": "0",
"errorMessage": "Success",
"orderNumber": "21000",
"orderStatus": 2,
"actionCode": 0,
"actionCodeDescription": "",
"amount": 444400,
"currency": "978",
"date": 1669360615204,
"depositedDate": 1669360643626,
"orderDescription": "",
"ip": "x.x.x.x",
"merchantOrderParams": [{
    "name": "browser_language_param",
    "value": "en"
}, {
    "name": "jccFirstInstallmentDate",
    "value": "12122023"
}, ...],
"transactionAttributes": [ {
    "name": "jccNbOfInstallments",
    "value": "12"
}...],
"attributes": [{
    "name": "mdOrder",
    "value": "01491d0b-c848-7dd6-a20d-e96900a7d8c0"
}],
...
}
The online store displays the final page with the payment results.
Logos
You can put custom JCC and Payment System (Mastercard, Visa, etc.) logos to web pages.
Use the following link to download logos: Custom logos.
3-D Secure authorization
What is 3-D Secure
3-D Secure (also called 3DS) is a technical standard created by Visa and MasterCard that allows you to perform additional authorization of the cardholder on the side of the issuing bank. In order to complete an online purchase, the cardholder is asked to provide proof of identity by entering a unique password, an SMS code, or a temporary PIN.
The term 3DS stands for 3 Domain Server. This name is used because every 3-D Secure transaction involves three parties:
- Acquirer domain. It acts as a 3DS requestor – initiator of authorization process.
- Issuer domain. It includes ACS (Access Control Server) that ensures validation of the payer by the issuing bank.
- Interoperability domain. It acts as a connector between first two domains. Usually, it is a payment system.
Protocol versions
Payment gateway supports 3-D Secure authorization to protect you and your clients from the threat of payment fraud.
For browser-base transactions, we use 3-D Secure v2 (also called 3DS2) – the updated version of 3-D Secure protocol that allows better information exchange between the three parties of the transaction. The 3DSv2 authentication Protocol, depending on the issuing Bank's ACS settings, allows you to perform authentication check without the customer's participation (Frictionless authentication). In this case, the customer will not be required to perform authentication actions, such as entering a one-time password or performing additional authentication checking actions.
Integration scenarios
If the payment page is on the payment gateway side, the merchant does not need any additional actions and can use the standard payment gateway API for integration.
If the payment page is on the merchant's side, when using 3-D Secure authorization, the merchant must send a number of additional API requests to the payment gateway.
See the integration schemes.